

6. Styling text with CSS
So far we have been dealing with the browser's default styling when it was presented with HTML code. This default styling is probably what has caused the content to be left-aligned, everything to be placed underneath one another, the text to be black and the font to have serifs. When we want something more than the default styling, using CSS code is the best solution. In the exercise below you will get to work with this CSS code.
6.1 Creating an external stylesheet
We put the code we use for the styling in a separate text file. You can create a new document with your text editor and then save it in a sub-folder of your website folder on the desktop. A logical name for the sub-folder would css be. You may choose the name of the css file yourself. In the example, the css file is called layout.css. In this new text file, enter the code below.
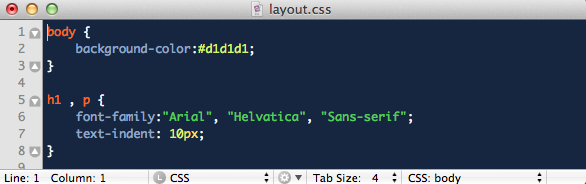
Because the text editor (TextMate) in the example gives colour to certain elements, it is easy to describe the various parts. The CSS code starts with the red word body. All red text in the CSS file is selectors called, and they refer to the HTML elements you typed earlier in the HTML file. So the word body refers to the body container in the HTML, which is the entire visible area in your browser. By giving that body selector a property background-color it is possible to change the background colour of the website from white to light grey. The yellow value assigned to the background-colour property is a hexadecimal colour code. You can colour code on Google look this up.
A colon is always placed between the property and the assigned value, and a semicolon is always placed after each assigned value to distinguish it from the next property. Finally, you can add several property rules to the body selector, and all those rules are held together by the curly brackets { }.
Tip: the comma between the h1 and the p selector is best read as an "and". If you leave out the comma in this example, no text will become Arial and the paragraph will not be indented by 10 pixels.
6.2 Linking an external stylesheet to the HTML
If you want the new CSS file to actually be included (read in) when the HTML file is opened, you need to add a reference to the new CSS file in the head of the HTML file. The code for this looks as follows.
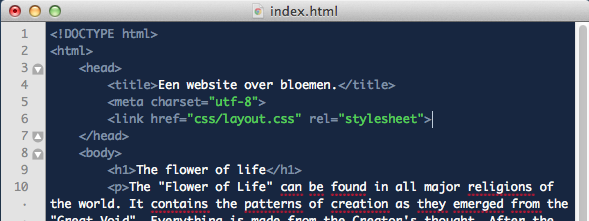
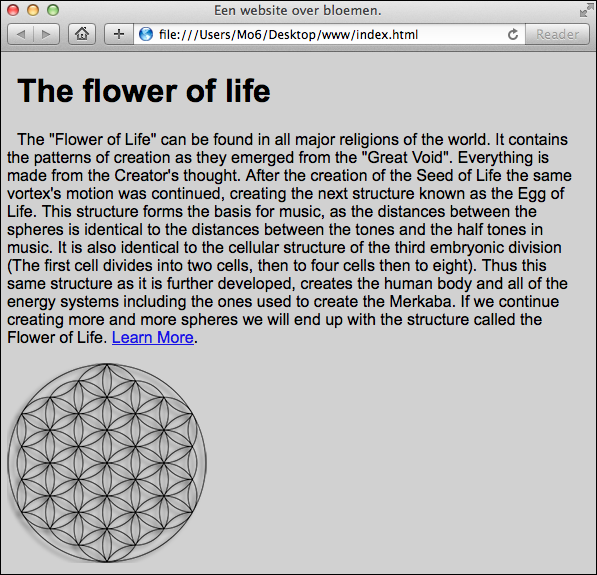
A link tag is placed in the head. This creates a connection to another file. You have already seen the href attribute earlier, when creating a link in the previous chapter. What is important in this case is that, in addition to the file name of the CSS file, you also specify the so-called path to this file. In this example the file name is preceded by the name of the folder the file is located in. Finally, a second attribute has been added, namely the rel attribute. This attribute is best read as "relation". The value assigned to the rel attribute is "stylesheet". In other words, the link/relation being made is to a CSS file. (You can also link to a JavaScript file, in which case the value of the rel attribute will no longer be stylesheet.) View the result in your browser; it should match the image below.